This walkthrough demonstrates Synapse concepts using a SciFi 2 along with the Synapse Headstage GUI or Synapse CLI client. To use this guide, you will need:
- A computer
- A SciFi 2 device
- A USB-C cable (optional)
Charge Your Device
You can charge SciFi 2 with the magnetic charging dock or over USB-C. Only the USB-C port closest to the GPIO connector supplies power.
You cannot charge over USB-C and use a probe adapter at the same time. If you need to run a probe while charging, use the dock.
Power On
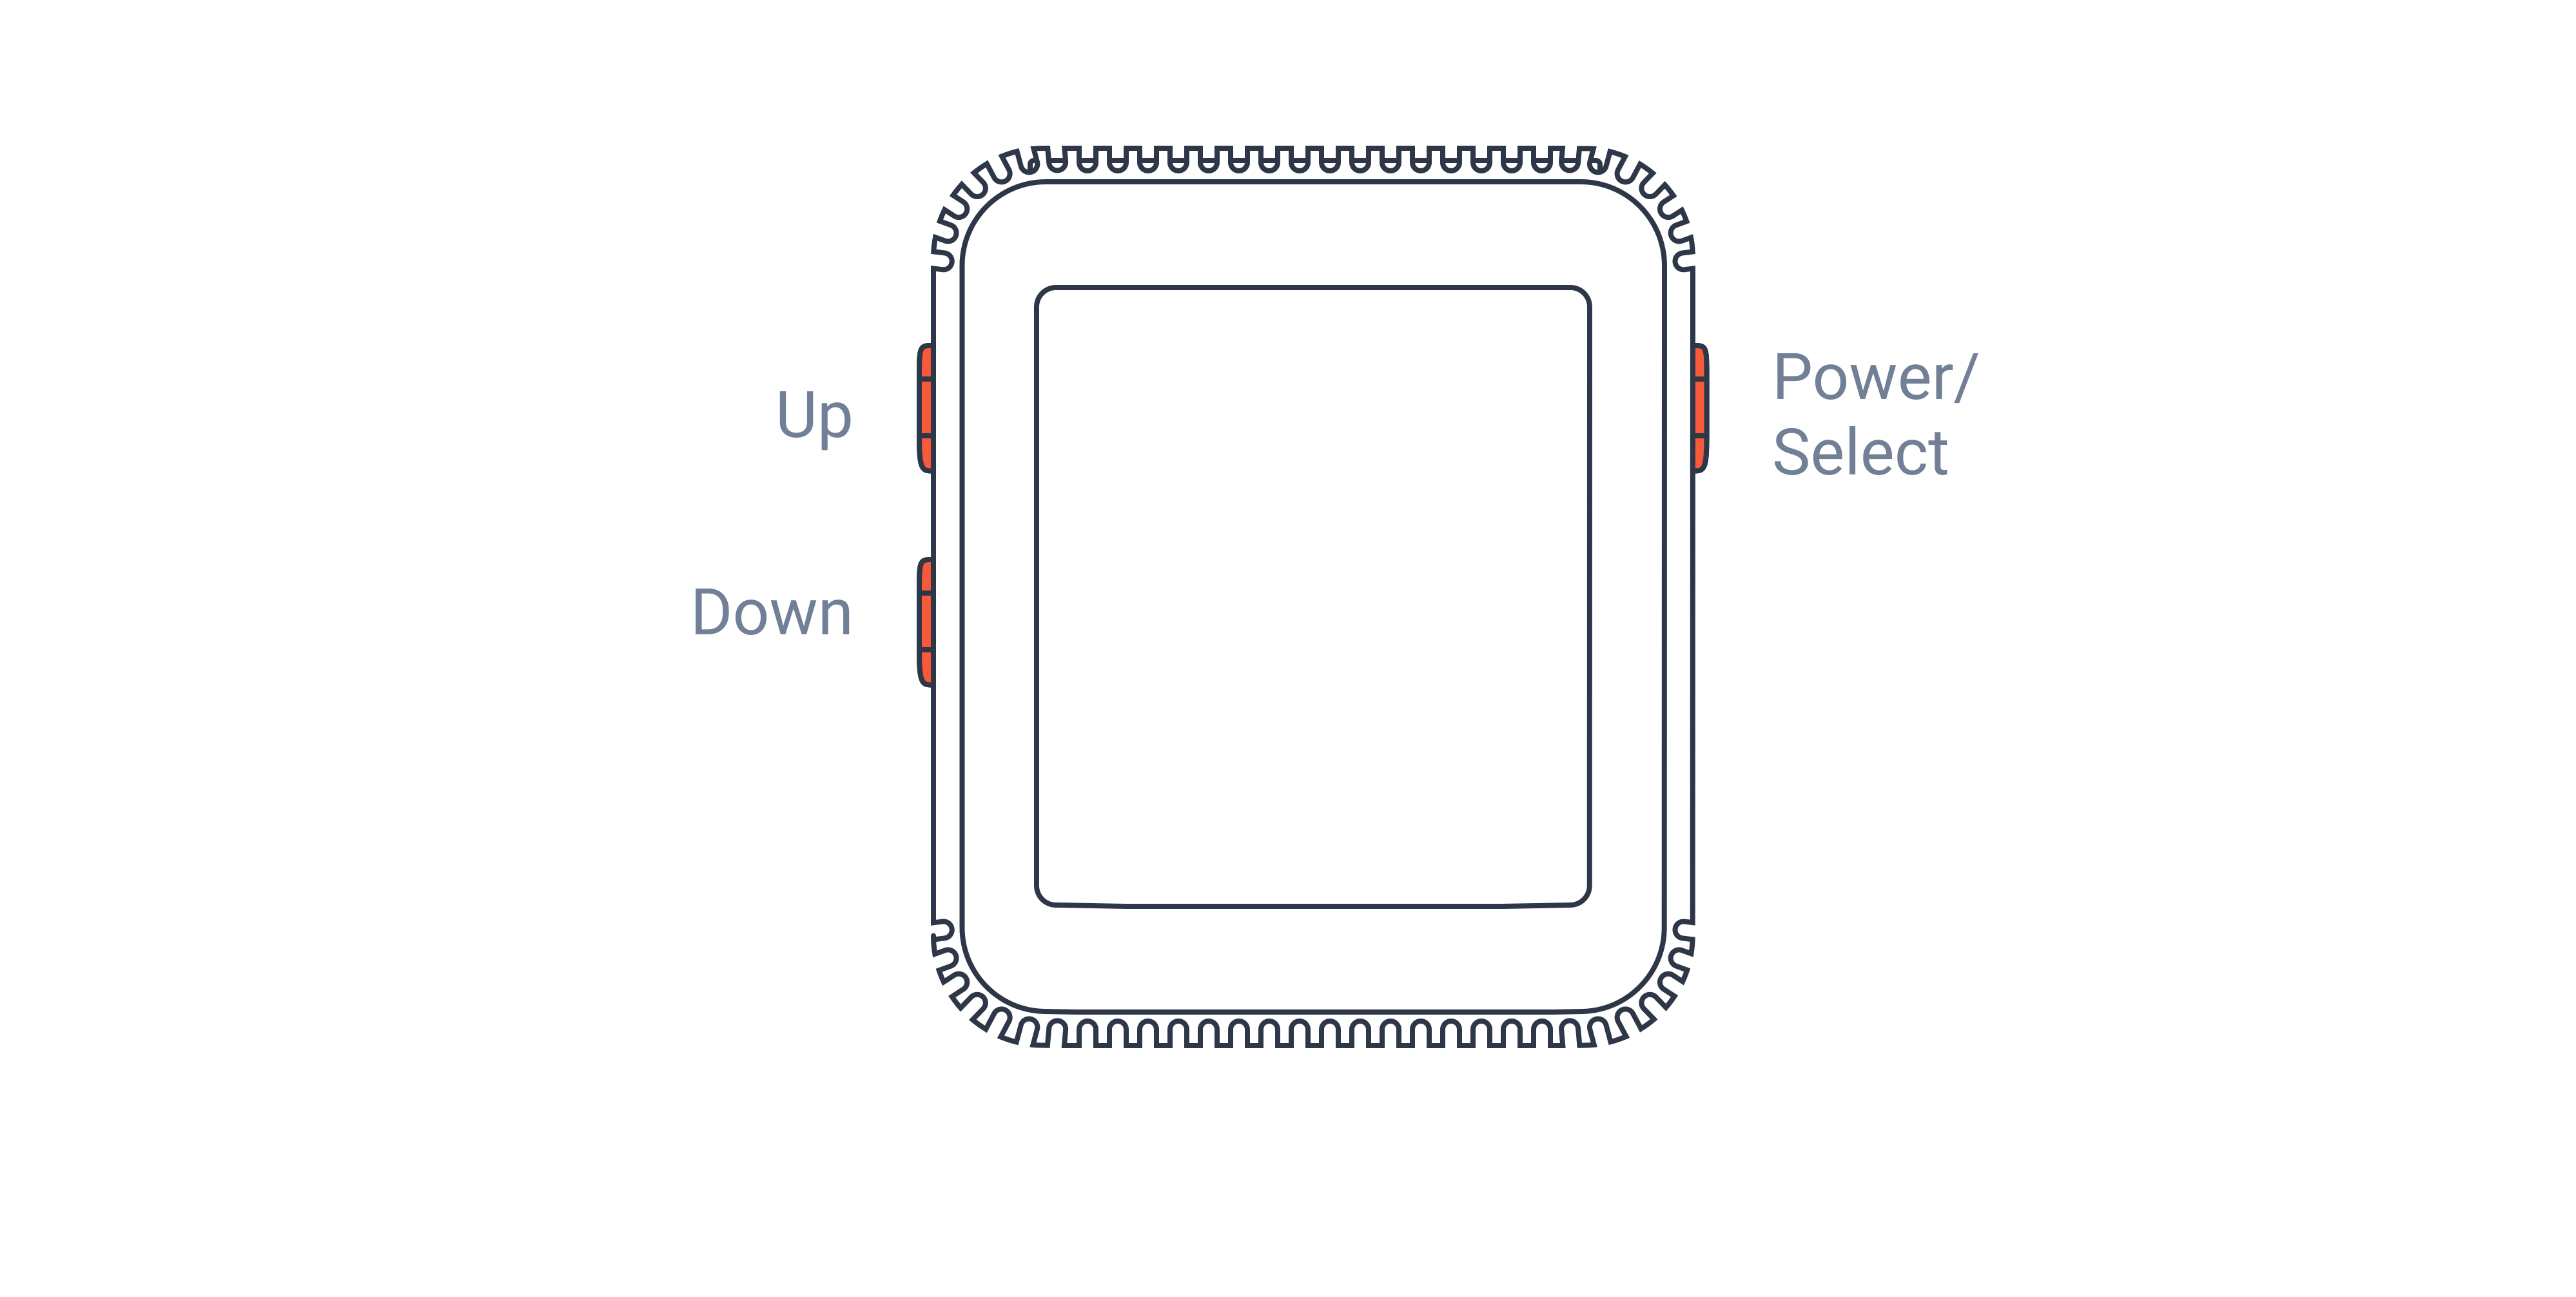
- Hold the power button on the right side of the device for 3 seconds.
- Navigate between the four main tabs using the Up and Down buttons, and open a tab with Select.
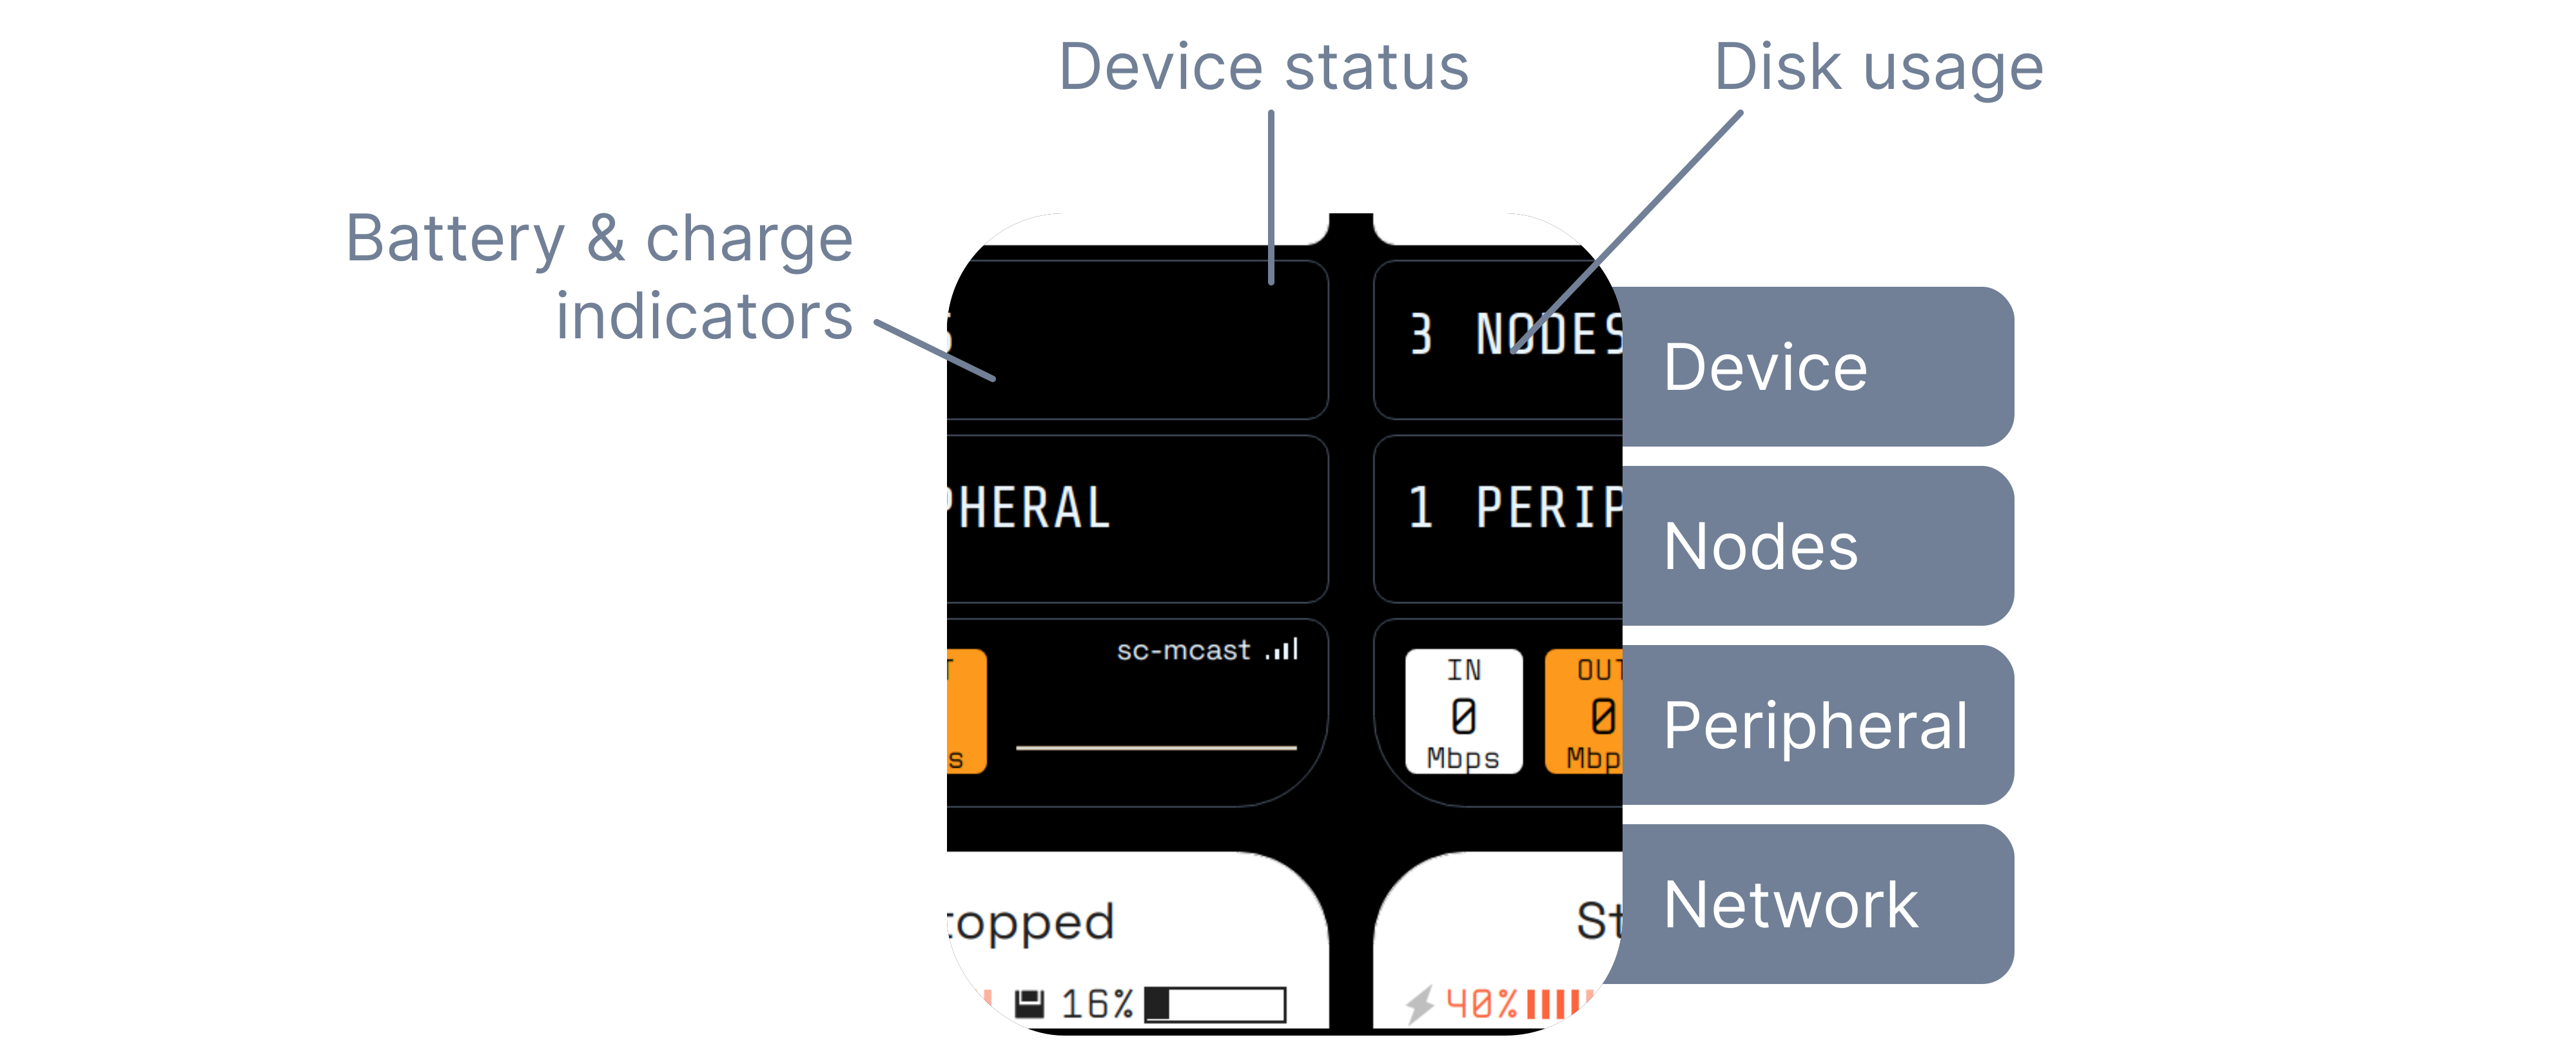
If the screen does not come on, see the FAQ.
Connect SciFi to Your Network
SciFi 2 streams data to your computer over WiFi and requires WiFi setup before its first use.
For the best throughput, connect SciFi 2 to a network dedicated to SciFi traffic and keep that network clear of other activity. A wired Gigabit Ethernet connection between your computer and the network is recommended but not required.
- Open the Network tab and select Configure Network.
- Select WiFi Setup > Start Wifi Config.
- Use your phone to scan the QR code on the device to join its access point.
- Use your phone to select your network from the dropdown and enter its password.
- The device leaves its own access point and joins the network you chose.
To do this from a computer instead of a phone, select Show Instructions below the QR code on the device.
Check for Software Updates
Before first use, update SciFi 2 to the latest firmware. On the device, go to Settings > Software Update > Check for update.
Set Up a Client
You can configure and control your device using the Synapse Headstage GUI, a desktop client for discovering, configuring, and operating devices visually. The same workflows are available from synapsectl, the command-line client, and from the Synapse Python client for scripting and automation.
Install the Headstage GUI
The Synapse Headstage GUI is a desktop client for discovering, configuring, and operating Synapse devices. It runs on Windows 10+, macOS Ventura (13.0)+, and Ubuntu 20.04 LTS+.
Loading the latest release…
Connect Your Device
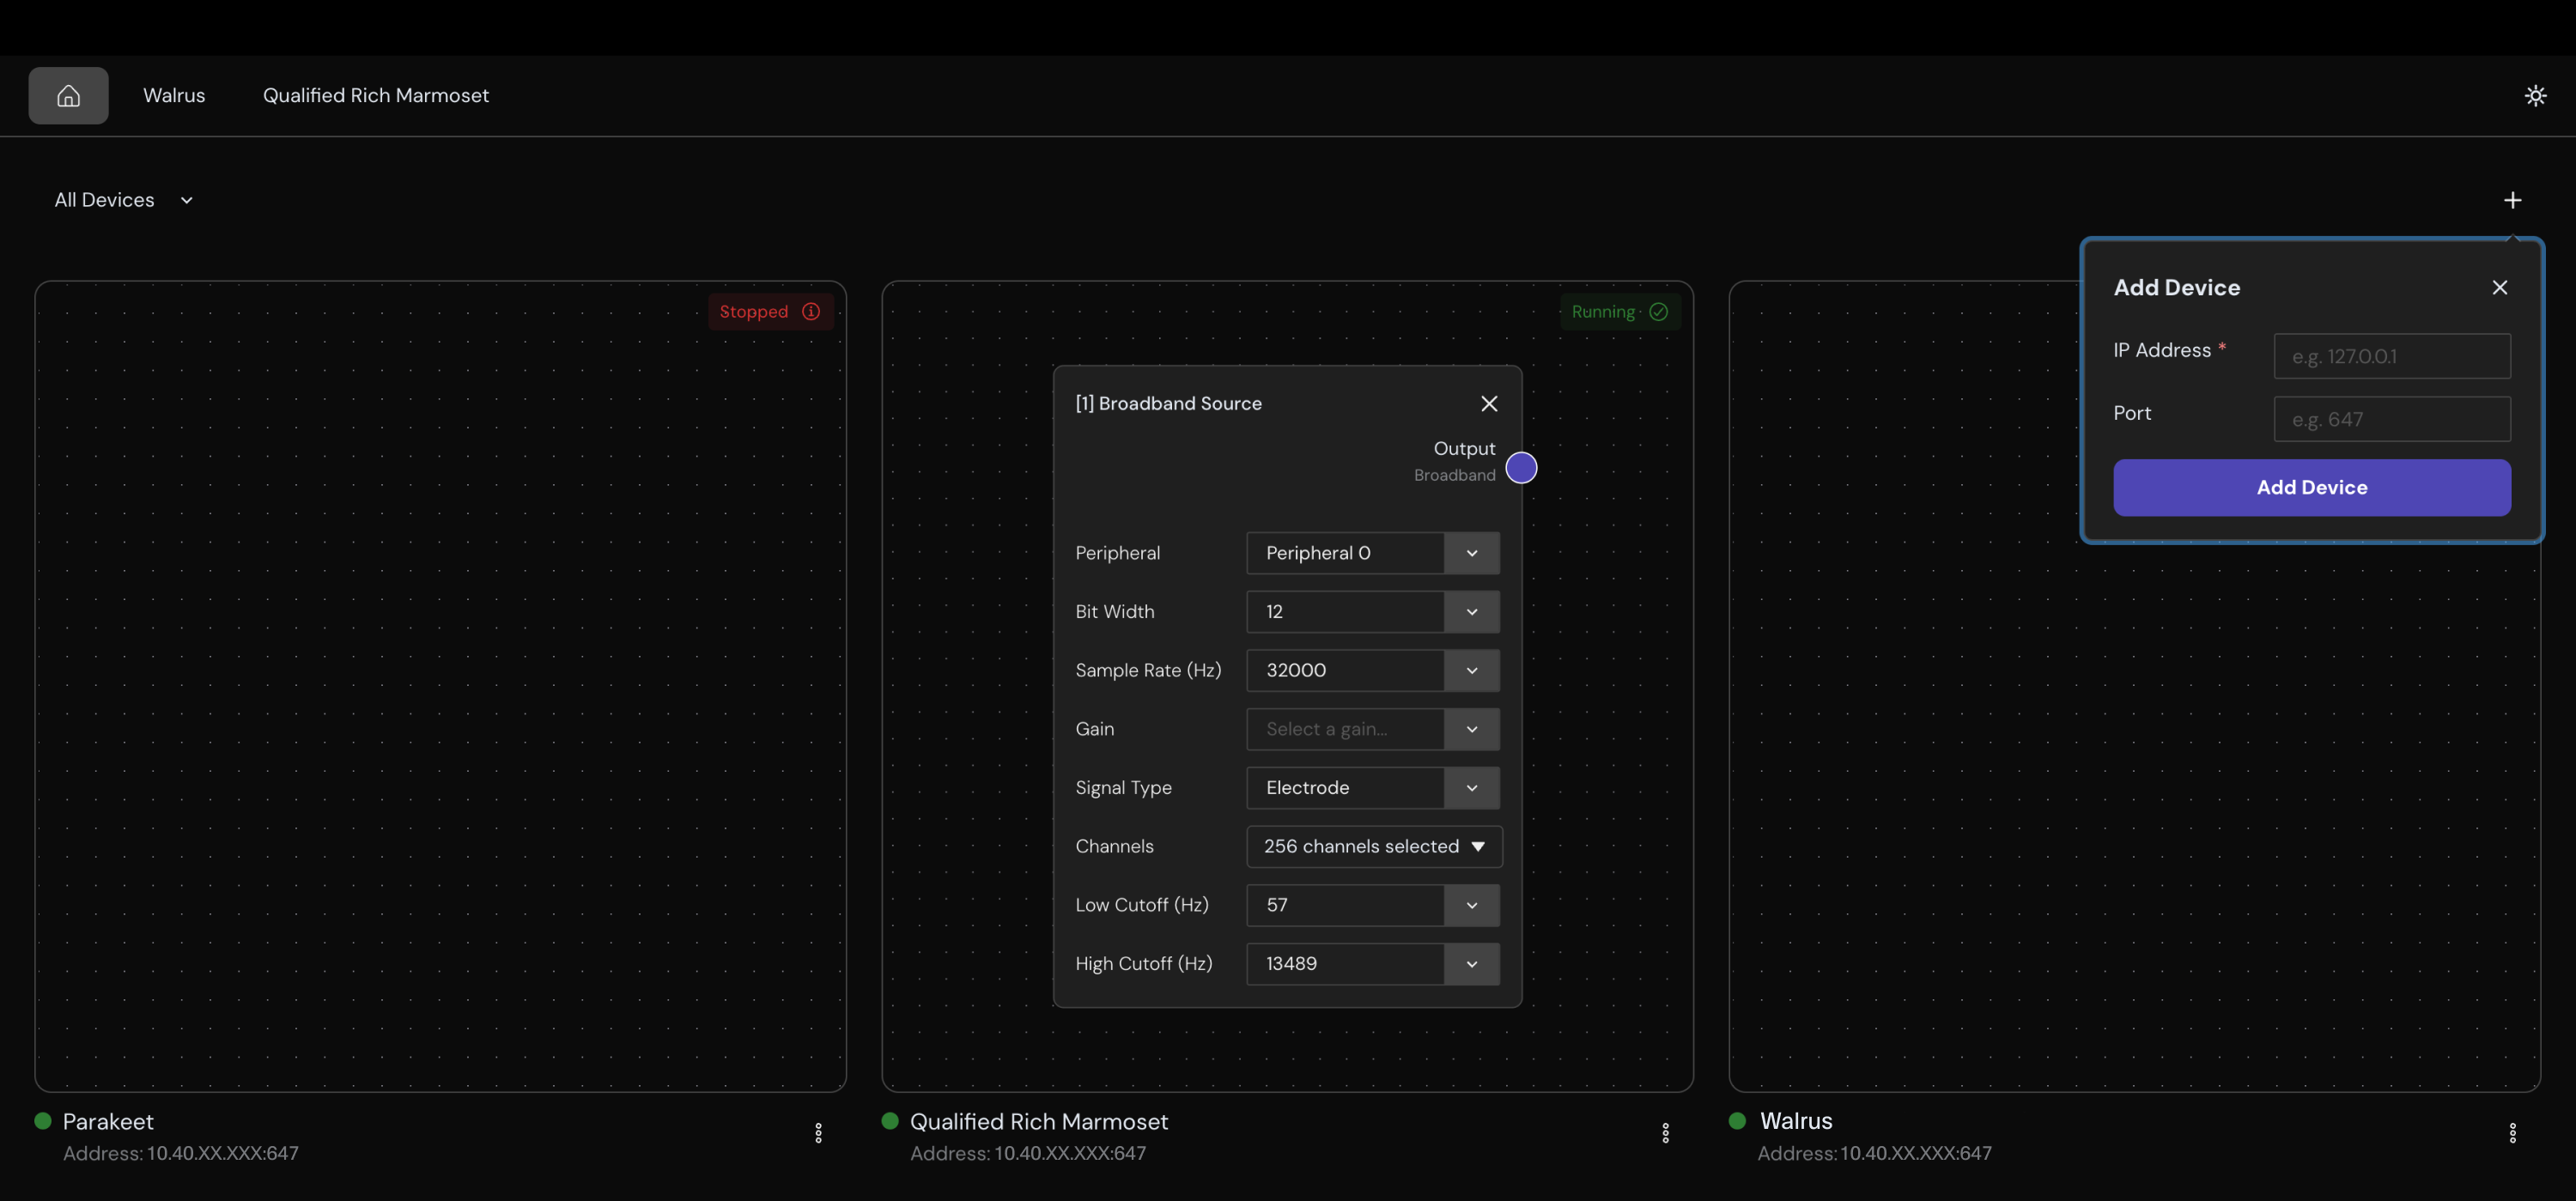
The homepage of the Synapse Headstage GUI will display all autodiscovered devices on your network, or you can add a device manually using the + option.
Configure and Start a Signal Chain
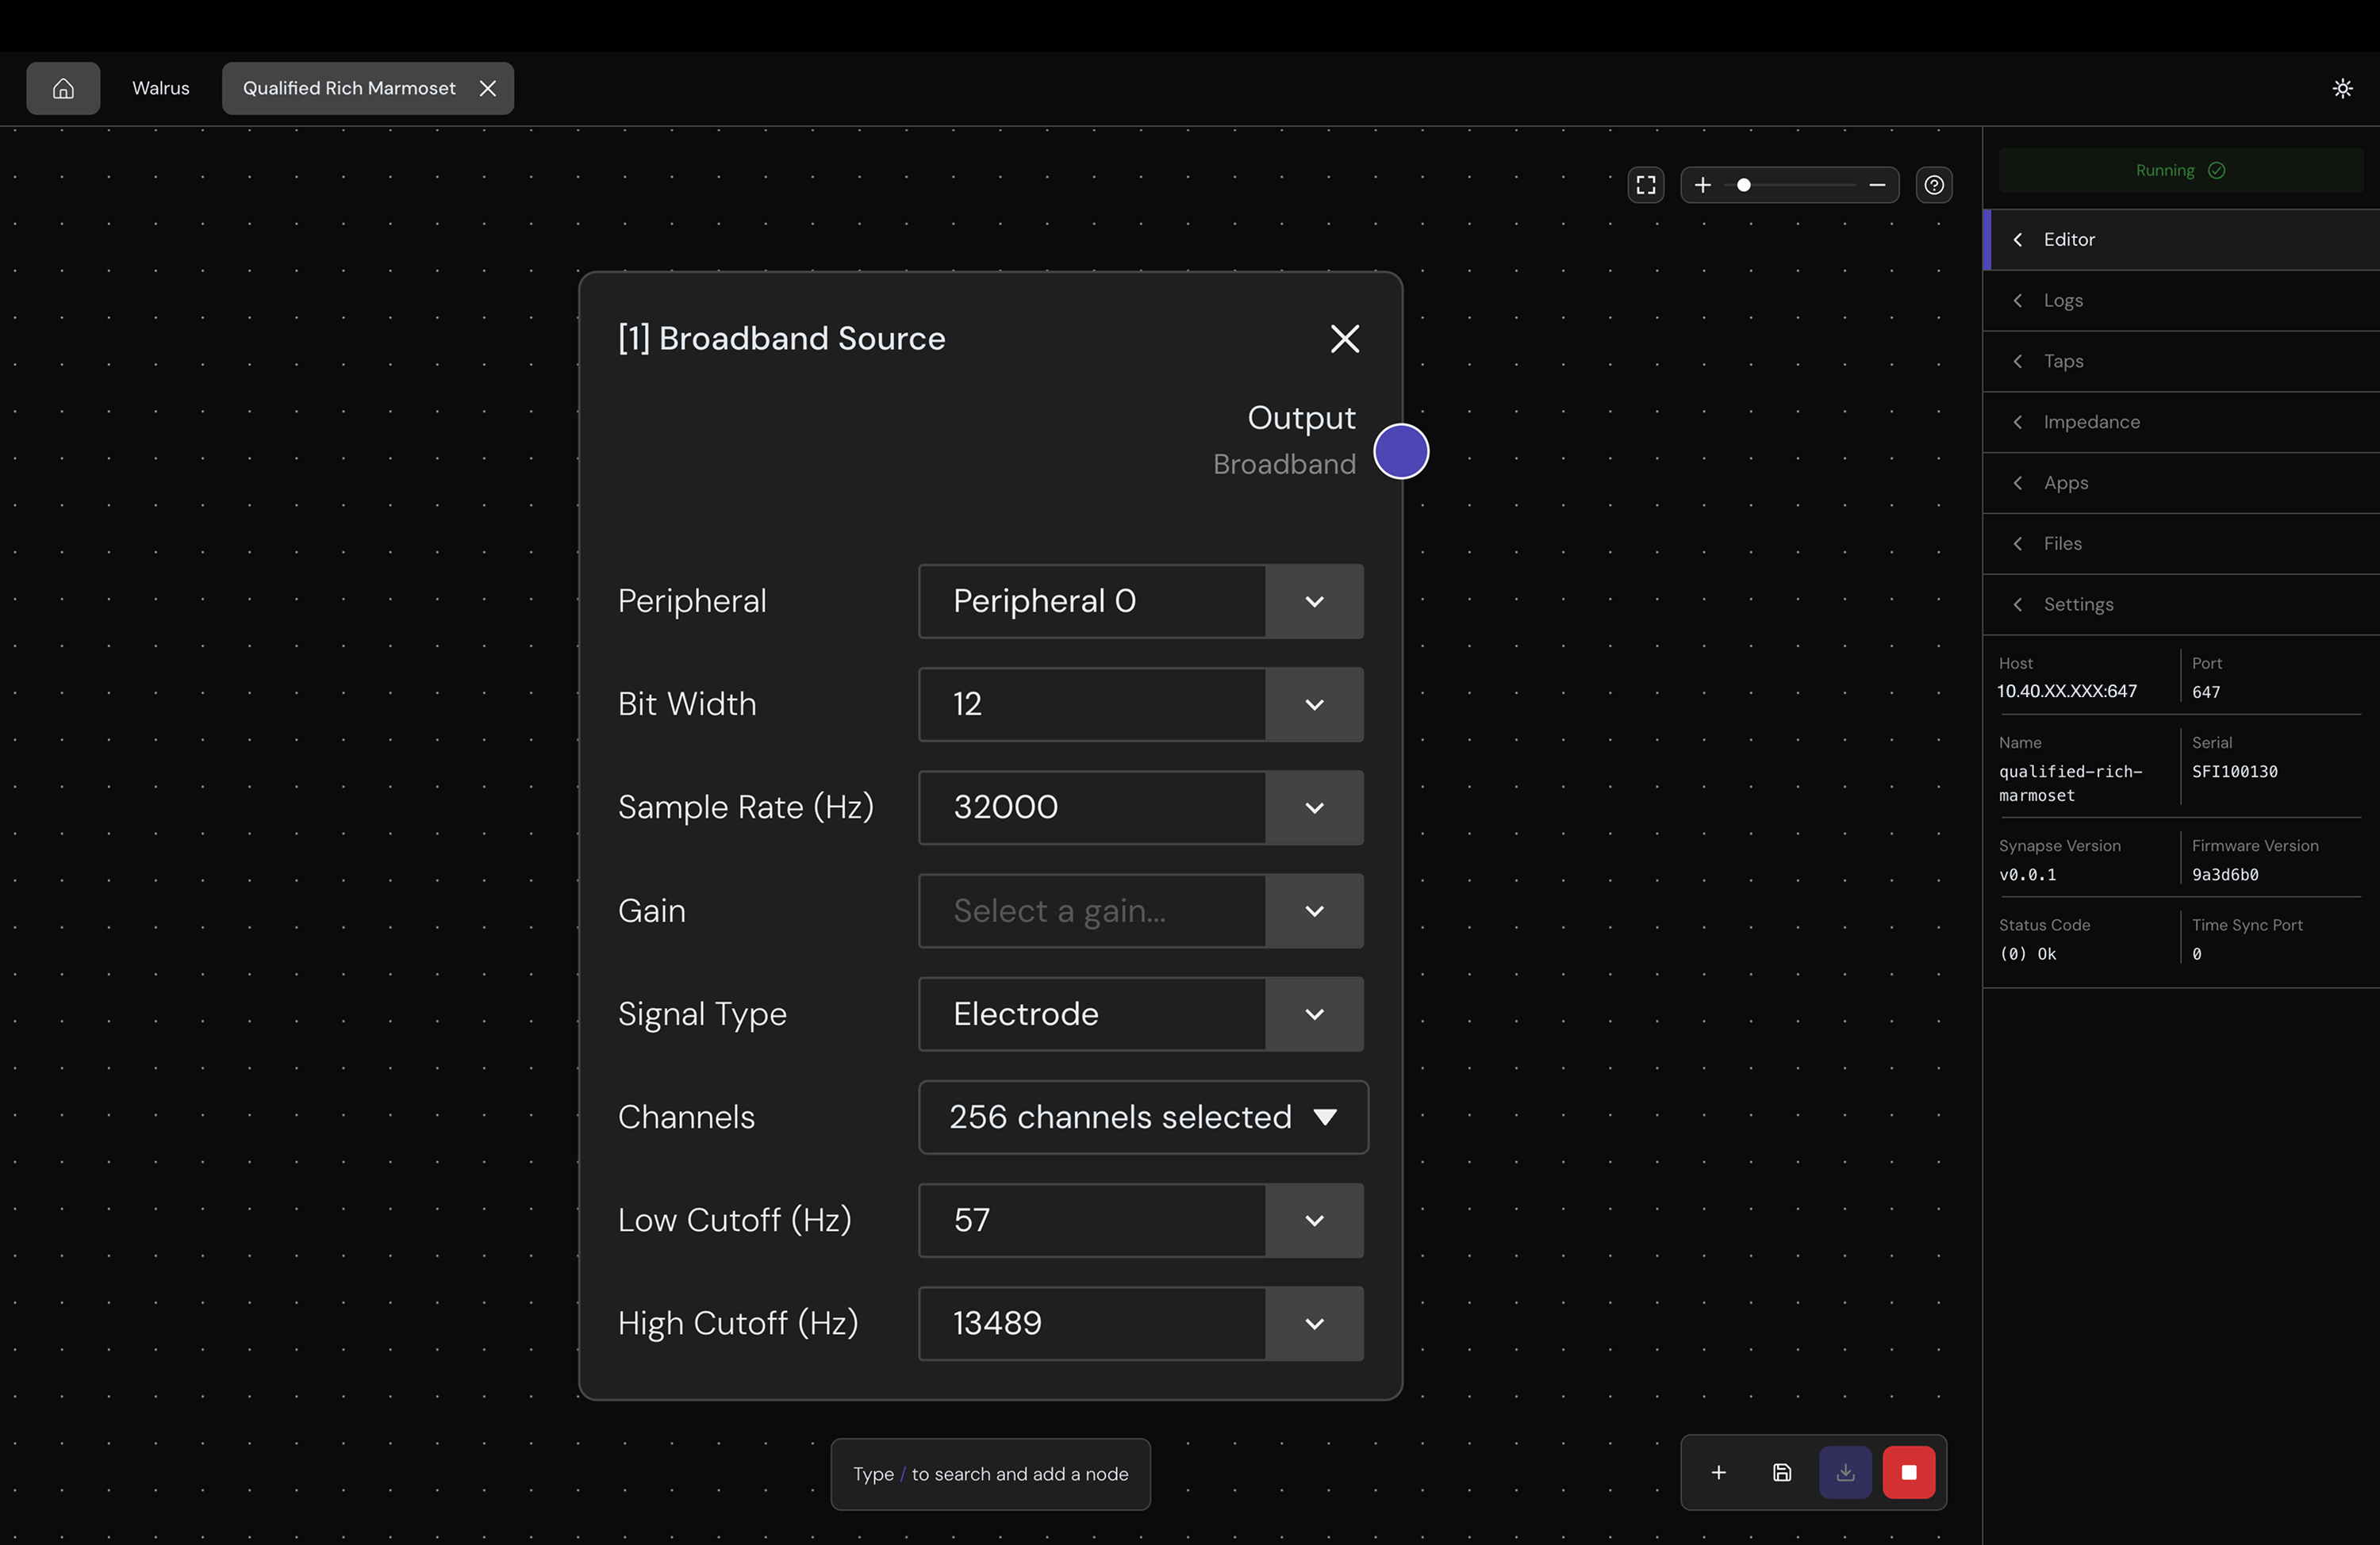
Signal chains define how data is processed on a device. This walkthrough uses generated simulated broadband data from the SciFi Virtual Recording Peripheral. If you want to use a physical peripheral, you will need to connect it to your device using a USB-C cable.
- Add a Broadband Source node in the device editor and select SciFi Virtual Recording Peripheral in the first drop down.
- Select the ↓ update button to send your signal chain to your device. A signal chain is necessary for data acquisition.
- Select ▸ start.
Record Data from a Tap
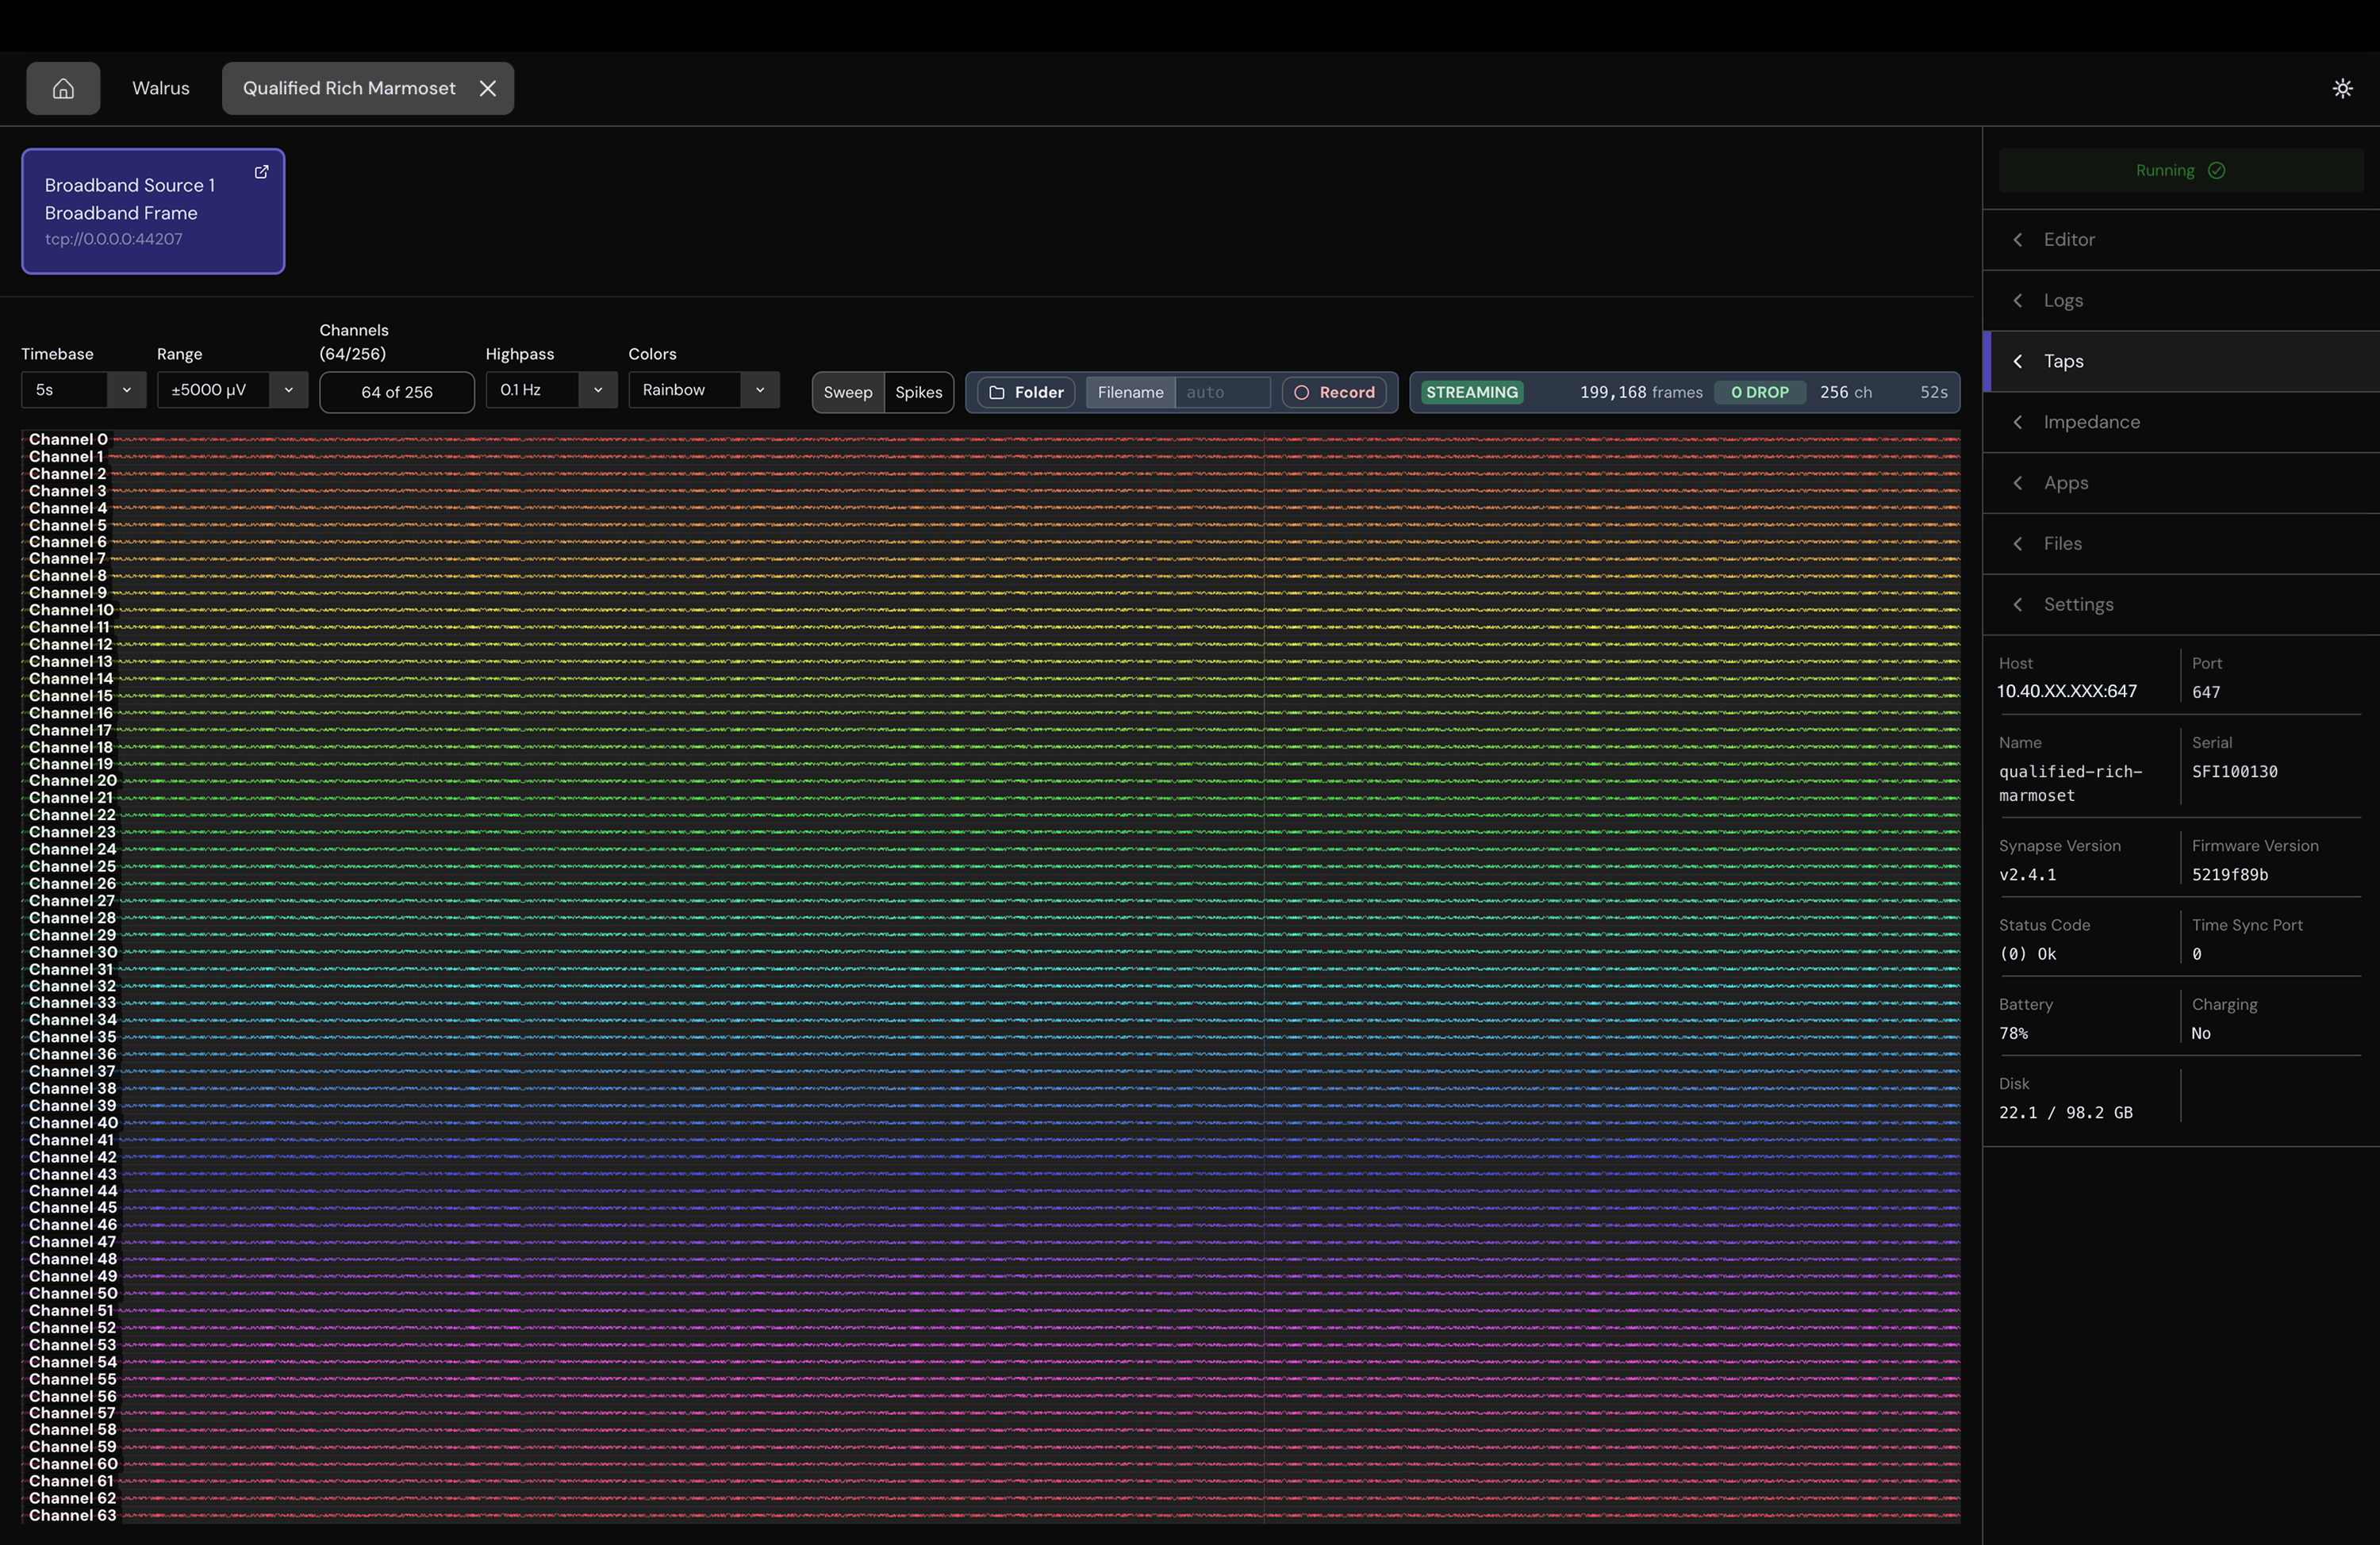
While your device is running, you can listen to the Tap corresponding to the Broadband Source node in your signal chain.
- Select Taps, then the Broadband Source node to see a livestream of your data.
- To save the stream in the Synapse HDF5 format, select Record, choose a location and file name, and begin recording. Select Record again when you are ready to stop.
Write to Disk
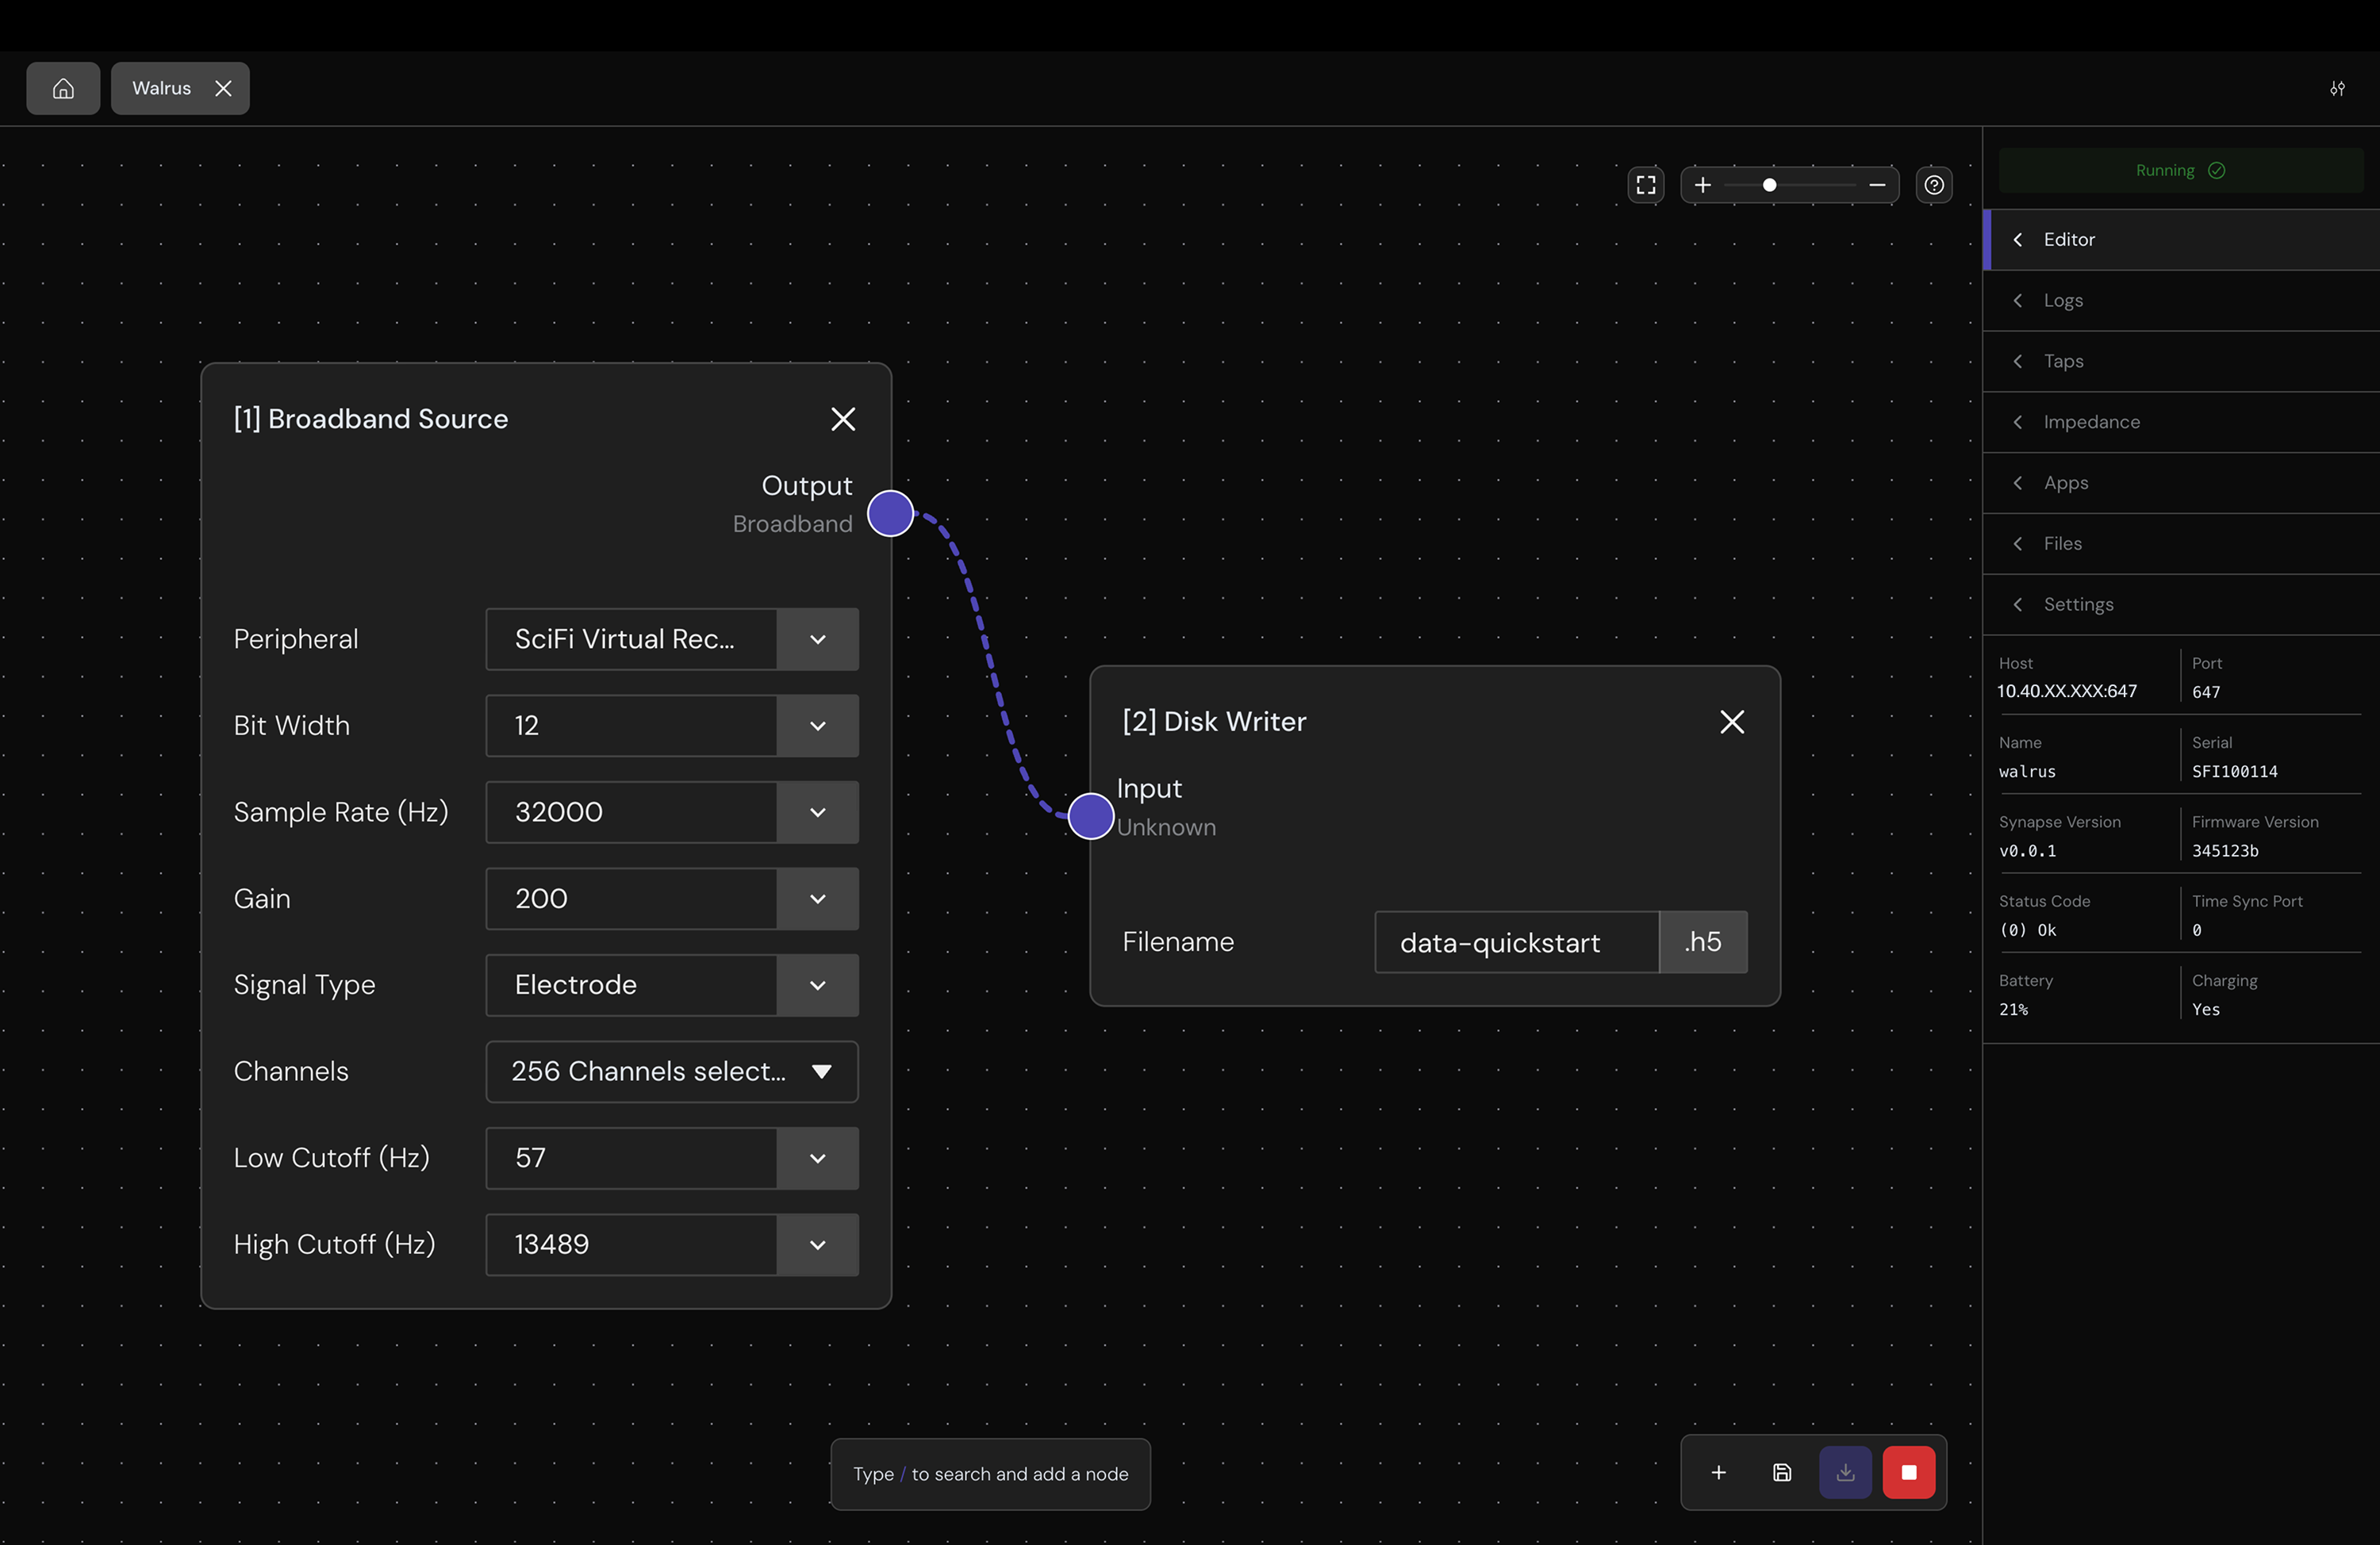
You can also save data directly to your SciFi.
- Return to the Editor tab and stop your signal chain.
- Add a Disk Writer node, and connect it to the output of the Broadband Source node.
- Update and start your new signal chain on your device and it will now write the broadband data to your device's onboard storage.
Access Files
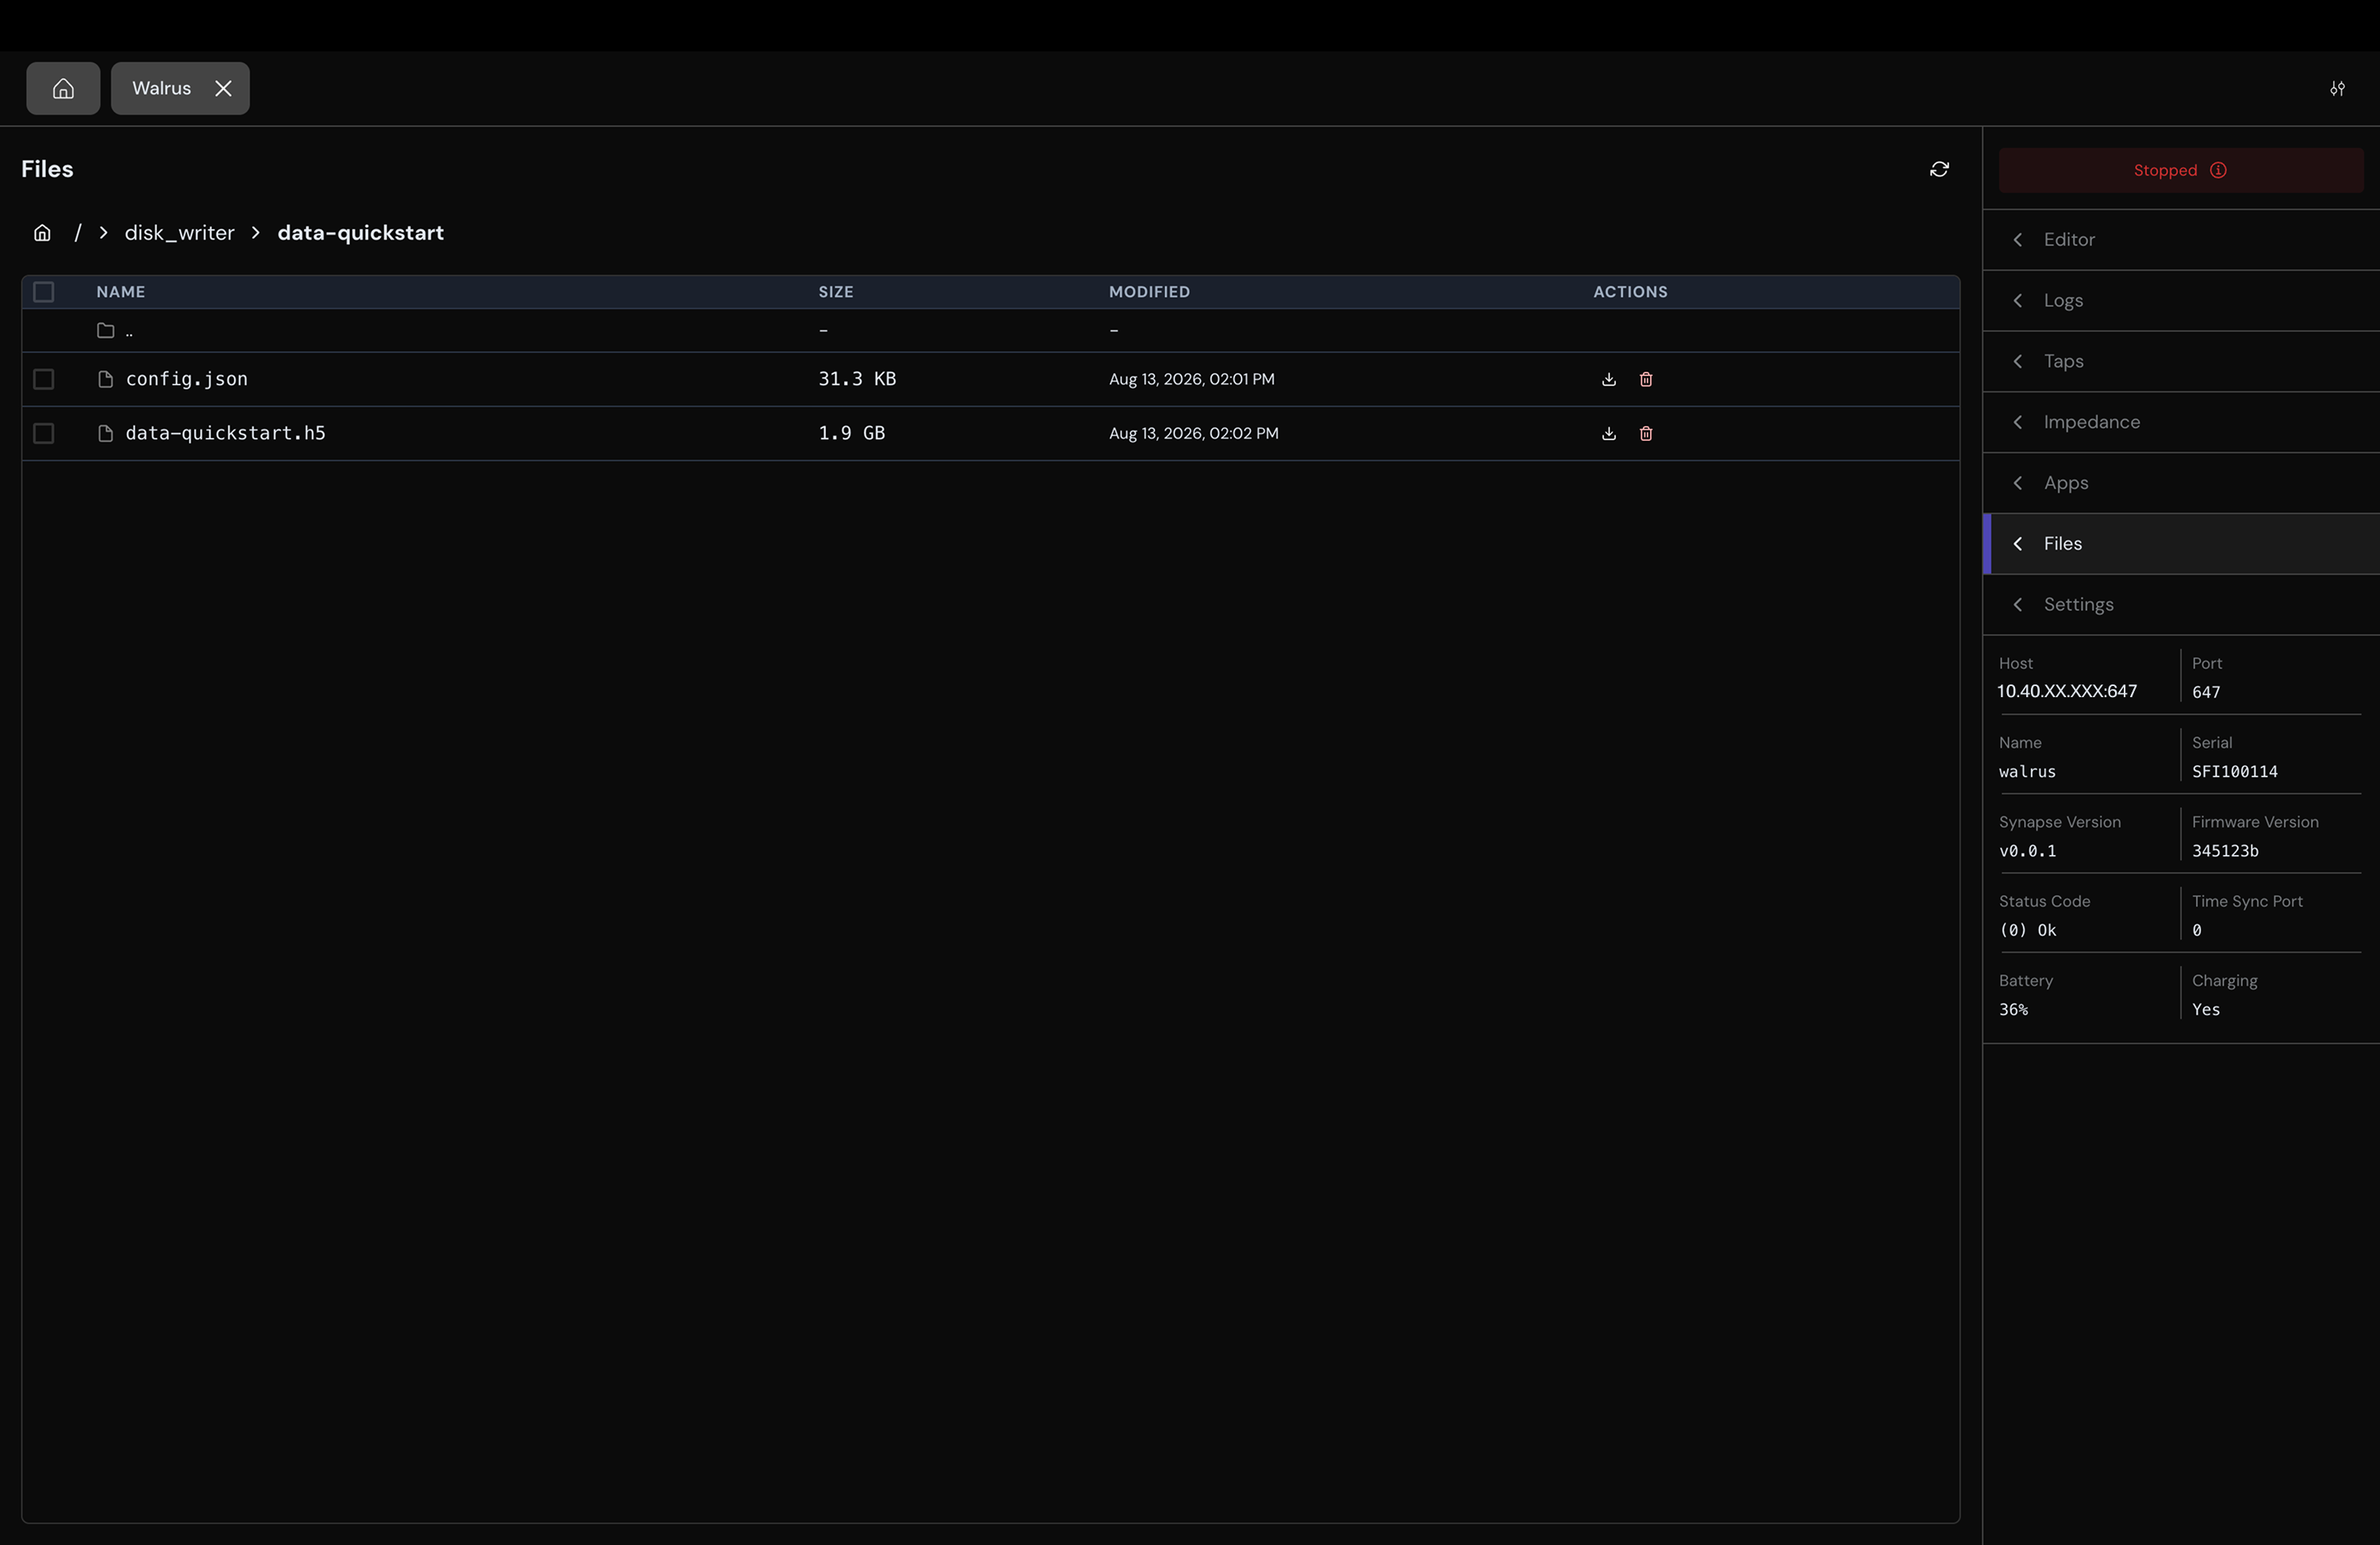
You can transfer files from your SciFi to your computer using a wireless or wired connection, but we recommend a wired connection for fastest transfer times.
- Connect your computer to the port closest to the GPIO connector using a USB-C cable.
- Open the Files tab in the GUI.
- Enter your SciFi's Disk Writer password, you can find it on your device under Settings > Device Info > DiskWriter Pass.
- Select your recording, and download it to your computer.
Filter Data
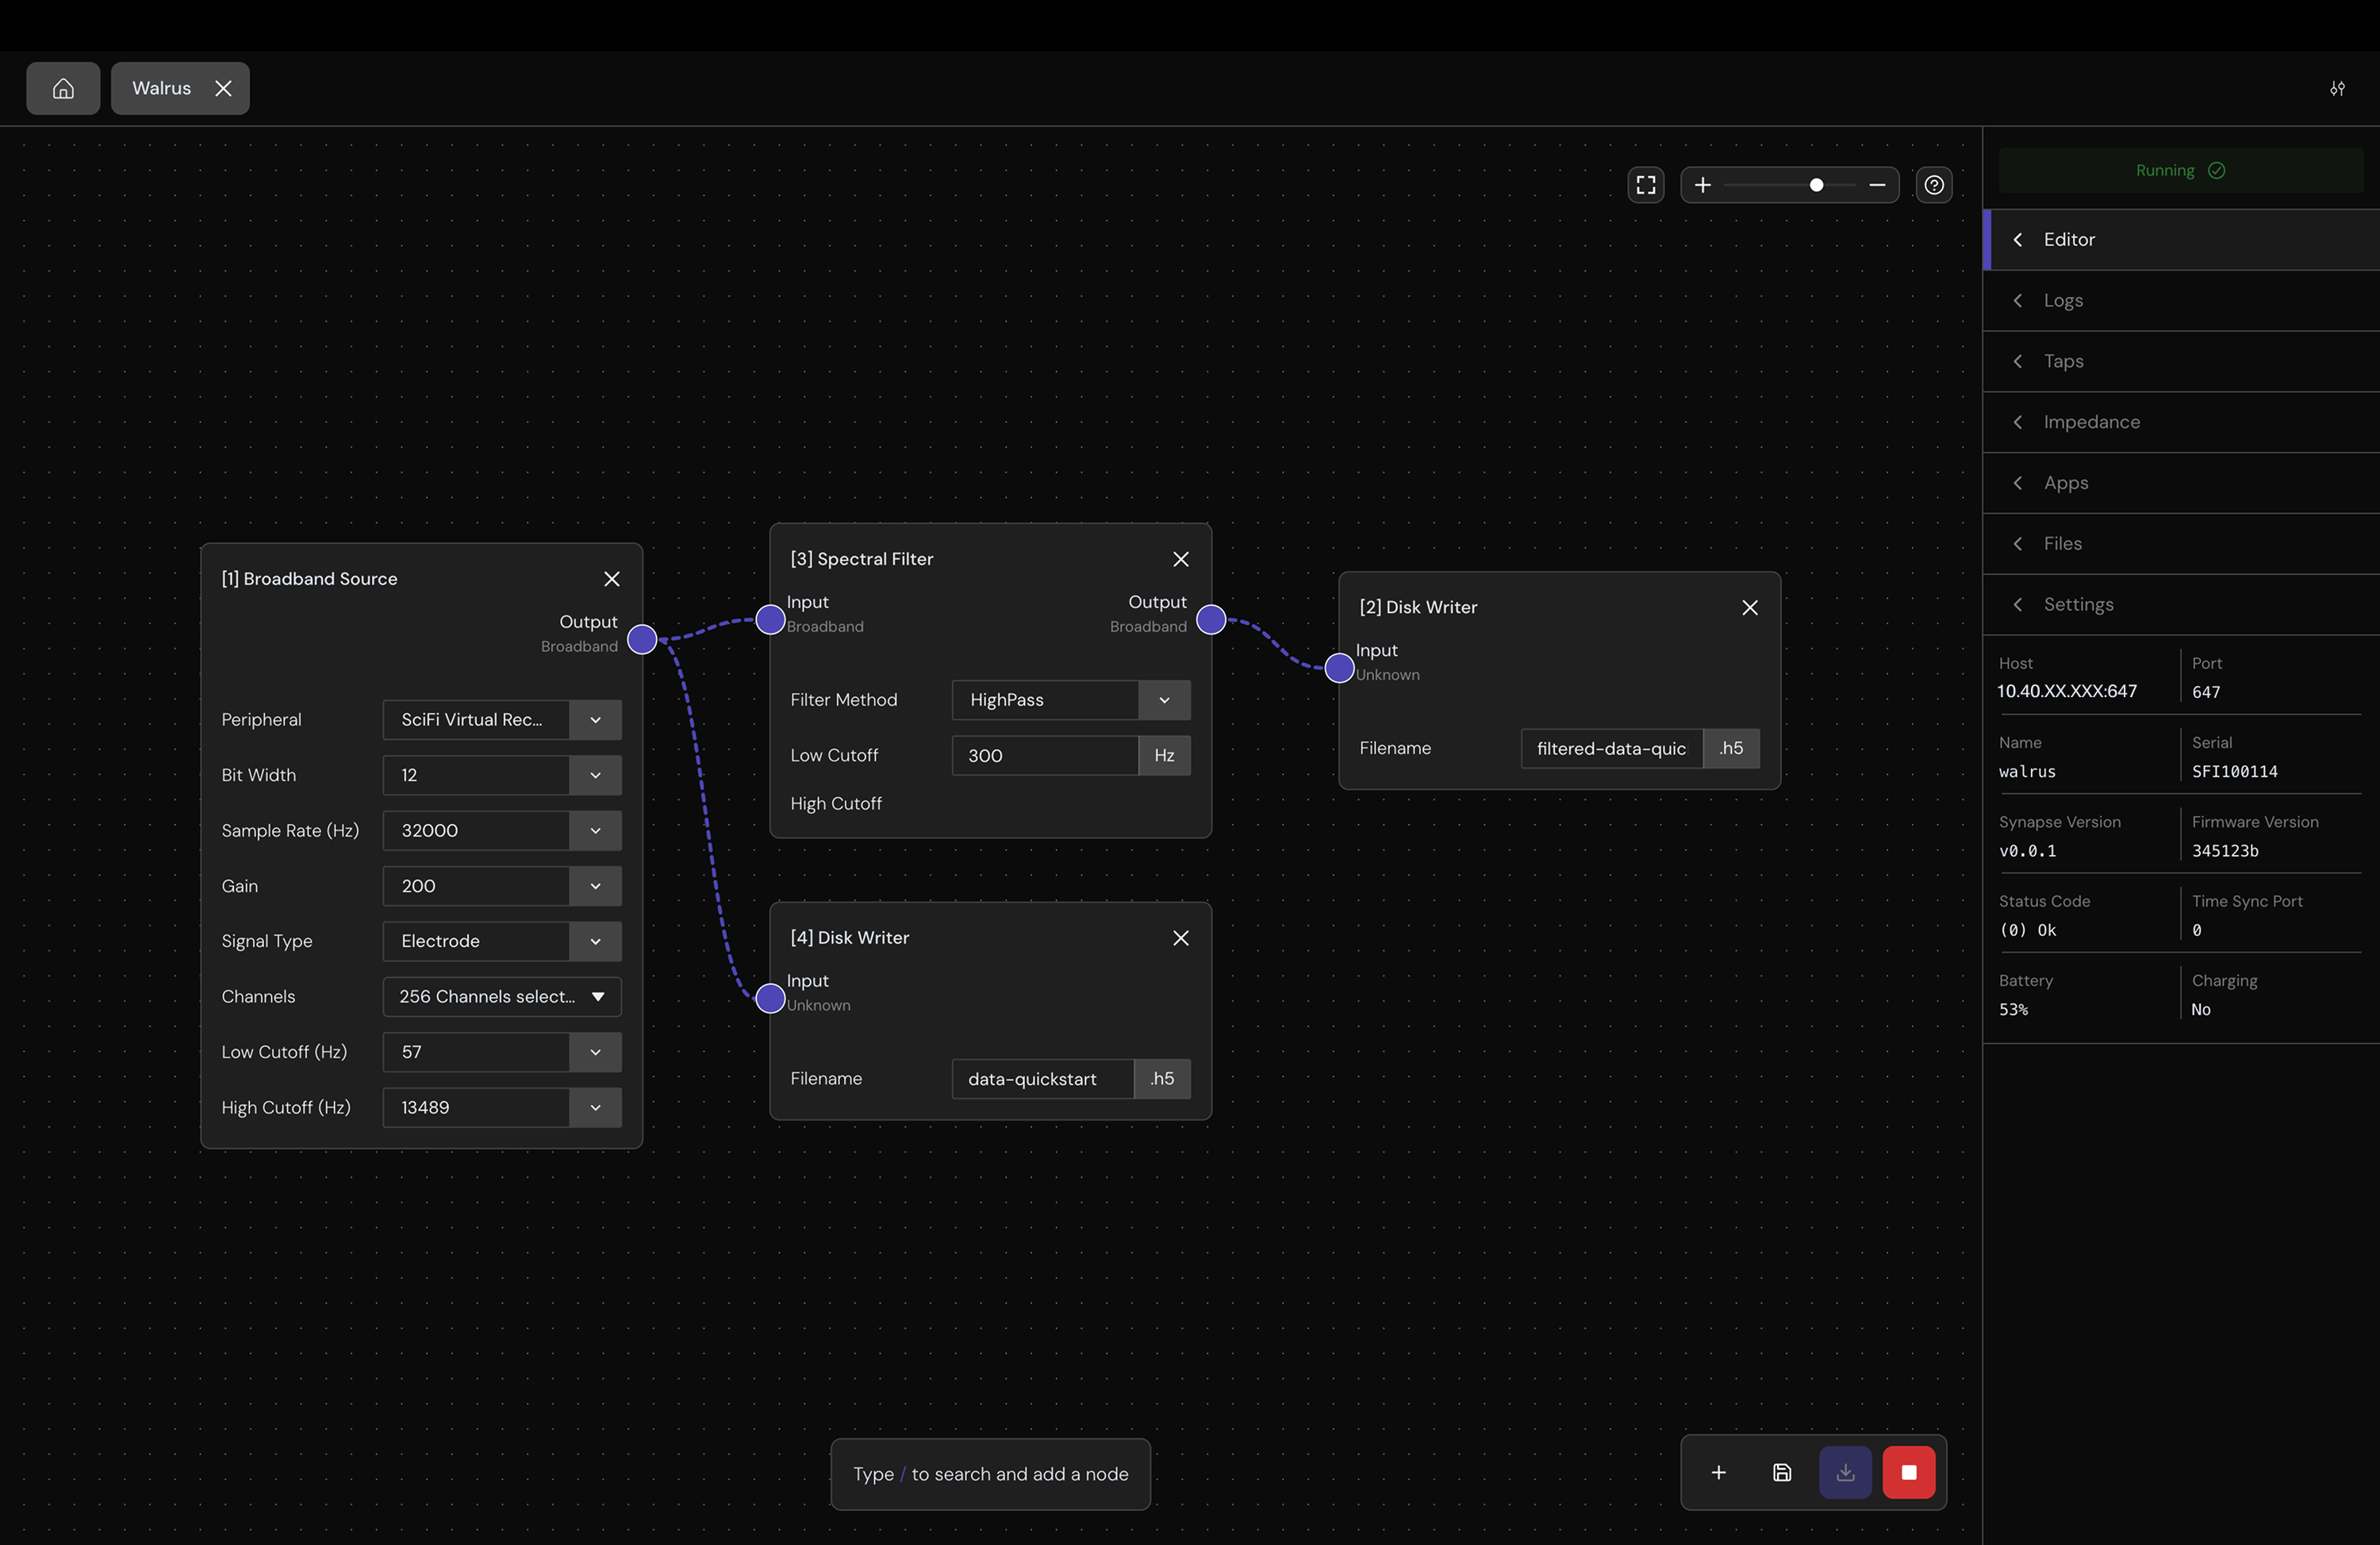
You can configure your SciFi to filter data using a Spectral Filter node.
- Return to the Editor tab and stop your signal chain.
- Add a Spectral Filter node and another Disk Writer node and connect them in series to the Broadband Source node.
- Adjust the filter parameters and give your second Disk Writer node a unique file name.
- Update and start your new signal chain on your device and it will now write unfiltered and filtered broadband data to your device's onboard storage simultaneously.
Install the Synapse CLI
synapsectl is the command line client for building, deploying, and monitoring Synapse devices. Before you begin, make sure you have Python 3 and pip installed. You will also need Docker to package and deploy Synapse Apps on your device, but this is outside the scope of this guide.
Mac, Linux, and Windows are supported. WSL does not currently support all Synapse features.
We recommend a virtual environment:
# create a Python virtual environment called myenv
python -m venv myenv

# activate your virtual environment
source myenv/bin/activate

# install Synapse in your virtual environment
pip install science-synapse
Confirm the install and list the available commands:
synapsectl --helpLinux UDP Buffer
On Linux, increase the UDP buffer size. To change it immediately:
sudo sysctl -w net.core.rmem_max=10485760 # 10 MB
sudo sysctl -w net.core.wmem_max=10485760 # 10 MB
To make the change persistent, add the following file and reboot:
sudo touch /etc/sysctl.d/50-udp-buffersize.conf
# And add these lines:
net.core.rmem_max=10485760
net.core.wmem_max=10485760
macOS UDP Buffer
To change the buffer size immediately:
sudo sysctl -w kern.ipc.maxsockbuf=10485760Or add the following to /etc/sysctl.conf:
kern.ipc.maxsockbuf=10485760Verify Your Device
Connect your computer to the same network as SciFi 2, then run the following command to confirm the device is reachable. Replace $DEVICE_IP with the address from the device's Network tab.
synapsectl -u $DEVICE_IP infoThe device reports its name, serial number, firmware version, status, and available peripherals:
   Name: walrus
   Status: Stopped
   Serial: SF2100001
   Synapse Version: v2.4.1
   Firmware Version: 8a0b6641
   Battery: 85.0%
   Storage Devices
   └── No storage devices found
   Peripherals
   ├── SciFi Virtual Recording Peripheral (Science Corporation)
   │   ├── ID: 100
   │   └── Type: kBroadbandSource
   └── VirtualOpticalStimPeripheral (Science Corporation)
      ├── ID: 101
      └── Type: kOpticalStimulation
If the command times out, your computer and SciFi 2 may be on a network that blocks device-to-device traffic. See the FAQ for troubleshooting.
Configure a Signal Chain
A signal chain defines how data moves through the device, and is sent to the device as a JSON configuration.
Use the following example configuration which ingests data from six electrodes, filters it through a bandpass filter, then writes the filtered data to the onboard device storage.
{
  "nodes": [
    {
      "type": "kBroadbandSource",
      "id": 1,
      "broadband_source": {
        "peripheral_id": 100,
        "bit_width": 12,
        "sample_rate_hz": 32000,
        "gain": 0,
        "signal": {
          "electrode": {
            "channels": [
              { "id": 0, "electrode_id": 0, "reference_id": 512 },
              { "id": 2, "electrode_id": 2, "reference_id": 512 },
              { "id": 4, "electrode_id": 4, "reference_id": 512 },
              { "id": 250, "electrode_id": 250, "reference_id": 515 },
              { "id": 252, "electrode_id": 252, "reference_id": 515 },
              { "id": 254, "electrode_id": 254, "reference_id": 515 }
            ],
            "low_cutoff_hz": 57,
            "high_cutoff_hz": 13489
          }
        }
      }
    },
    {
      "type": "kSpectralFilter",
      "id": 3,
      "spectral_filter": {
        "method": "kBandPass",
        "low_cutoff_hz": 92,
        "high_cutoff_hz": 4365
      }
    },
    {
      "type": "kDiskWriter",
      "id": 2,
      "disk_writer": {
        "filename": "scifi-test",
        "storage_device_id": 1
      }
    }
  ],
  "connections": [
    { "src_node_id": 1, "dst_node_id": 3 },
    { "src_node_id": 3, "dst_node_id": 2 }
  ]
}
Send the configuration and start the device:
# send your configuration
synapsectl -u $DEVICE_IP configure $PATH_TO_CONFIG.json

# start the device
synapsectl -u $DEVICE_IP start
Stream a Tap
Read from the Broadband Tap and save the stream to your computer as HDF5:
synapsectl -u $DEVICE_IP read --output $OUTPUT_PATHStop the device when you are finished:
synapsectl -u $DEVICE_IP stopDownload a Recording
List the device's own storage and retrieve it:
synapsectl -u $DEVICE_IP file ls disk_writer/
synapsectl -u $DEVICE_IP file get -r disk_writer/scifi-test
The first time you access files on your device, you will be prompted for its Disk Writer password. You can find it on your device's display under Settings > Device Info > DiskWriter Pass.
Deploy a Synapse App
Synapse Apps are custom applications that run directly on your device as a node in your signal chain. You can control Synapse Apps in the Synapse Headstage GUI, but you will need to use the Synapse Python client to set them up.
To use the Synapse Example App, you'll first need to:
- Install and run Docker
- Configure SSH access to GitHub
- Clone the repository through SSH.
git clone git@github.com:sciencecorp/synapse-example-app.git
cd synapse-example-app
git submodule init
git submodule update
After it is cloned:
- Build a Debian
.debpackage by following the Synapse App SDK. - Open the Apps tab in the Synapse Headstage GUI, select Deploy App, and choose the
.debpackage you want to deploy to your SciFi. - Return to the Editor tab, add an Application node to your signal chain, and select
synapse-example-appin the node's dropdown. - Update and start your new signal chain on your device.
Open the Taps tab to observe the Taps published by the running app. Select joystick_out to view the joystick values produced by the example app. Select app_logs to inspect the app's runtime logs.